FPN for Object Detection

My notes of reading this paper.

FPN stands for Feature Pyramid Network, used for improving Object Detection.

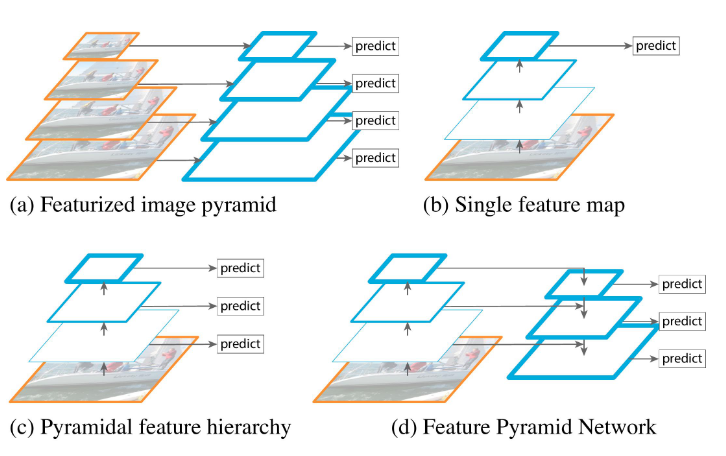
One traditional way to do Object Detection is to use sliding window with multiple window sizes which is in (a). However this method is slow and computational intensive. (b) and (c) are mentioned for approaches that used by others to overcome the disadvantage of (a).

The author also mentioned that a deep ConvNet can generate multiple scale features by sampling. However these feature maps for different spatial resolutions have large gaps which can harm the result.

(d) is the method this paper is promoting.

Resolution and semantic of feature :

Bottom-up, up-down path way and lateral connections

Bottom-up pathway is a regular ConvNet backbone with scale step=2(ResNet here), Up-down pathway is scaling up with step size=2 (with nearest neighbor upsampling).

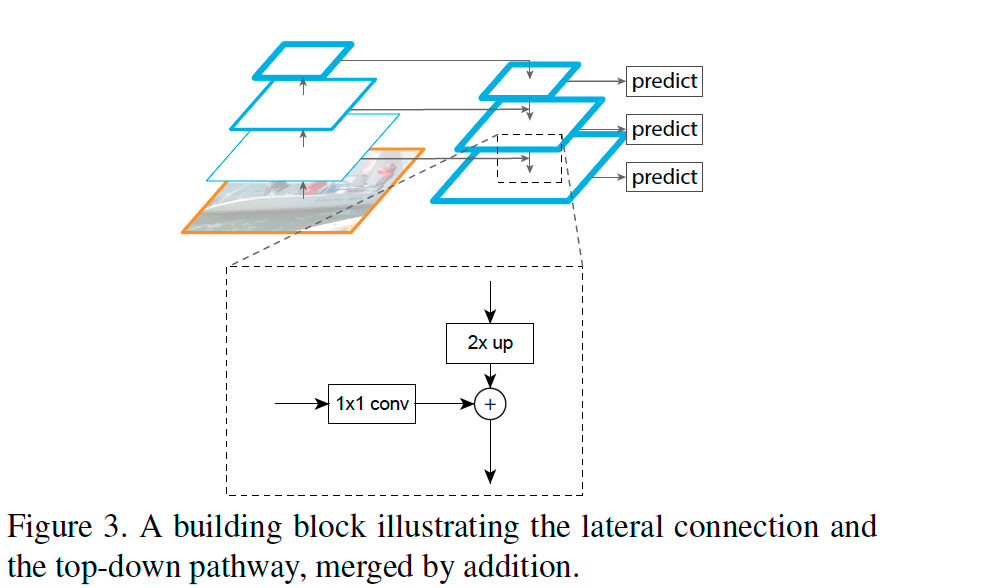
When adding the Bottom-up layer to the Up-down layer, the Bottom-up layer on the left has x2 times more channels, so it uses Conv 1×1 to reduce channel number to add the layer on the right by element wise. The up-down layer on the right has to upsample (x2) to match the hight and width of the left. The upsample can cause aliasing effect. Conv 3×3 is used to reduce this aliasing effect.

Code can find found here. Also thanks to this video for better understanding.

Nested X Server

Use Xephyr to run a second X window with 8bit color depth in Raspberry Pi
https://nims11.wordpress.com/2012/06/24/nested-x-servers-with-xephyr/

Xephyr -ac -screen 800x600x8 -reset :1 &

This will open a blank window
In the original window, type
DISPLAY=:1

Then run the C program. It show “Colomap_size: 256”.
It worked!

Setup SSL for MySQL replication

MySQL replication is setup already. Now I need to add SSL so the communication between server and client will be secure.

1. generate CA certificate and server key/cert on Master

CA certificate
openssl genrsa 2048 > ca-key.pem
openssl req -new -x509 -nodes -days 1000 -key ca-key.pem -out ca-cert.pem

Server Key/Cert
openssl req -newkey rsa:2048 -days 1000 -nodes -keyout server-key.pem -out server-req.pem
openssl x509 -req -in server-req.pem -days 1000 -CA ca-cert.pem -CAkey ca-key.pem -set_serial 01 -out server-cert.pem

2. enable SSL on master
add the following to both [client] and [mysqld]

ssl-ca=/var/lib/mysql/ssl/ca-cert.pem
ssl-cert=/var/lib/mysql/ssl/client-cert.pem
ssl-key=/var/lib/mysql/ssl/client-key.pem

3. generate client key/cert on Slave

openssl req -newkey rsa:2048 -days 1000 -nodes -keyout client-key.pem -out client-req.pem
openssl x509 -req -in client-req.pem -days 1000 -CA ca-cert.pem -CAkey ca-key.pem -set_serial 01 -out client-cert.pem

4. enable SSL on slave
repeat 2, but on slave server and using keys/cert of slave, restart db with skip-slave-start

5. start slave

mysql>change master to master_host=’masterdb’, master_user=’repliuser’, master_password=’pass’,master_log_file=’db1-bin.xxxxx’, master_log_pos=98, MASTER_SSL=1, MASTER_SSL_CA=’ssl/ca-cert.pem’;
start slave

6. setup User permission to use SSL only
User “GRANT” to setup user allow SSL connection only

Check if SSL is on in mysqld

mysql> show variables like ‘%have_ssl%’;
+—————+——-+
| Variable_name | Value |
+—————+——-+
| have_ssl | YES |
+—————+——-+

Check if Client is using SSL:

>mysql
SHOW STATUS LIKE ‘Ssl_cipher’;

Useful MySQL command

Check processlist in MySQL
mysql -p -e “show processlist”

Get each mysql db table’s engine type
select table_schema, table_name from information_schema.tables;

mysql logging

There’re 2 ways to enable mysql query logs

in /etc/my.cnf

log=/var/log/mysqld-query.log

or add ” –log” in start script

/usr/bin/mysqld_safe –datadir=”$datadir” …. –log >/dev/null 2>&1 &

How to stop binary log
remove the following from my.cnf

log-bin=mysql-bin
binlog_format=mixed

SQL — MySQL

Insert

INSERT INTO tablename (col1, col2) VALUES(‘data1’, ‘data2’ );

Grant
GRANT ALL PRIVILEGES ON dbname.* to dbuser@localhost;
GRANT ALL PRIVILEGES ON dbname.* to dbuser@”%”;
GRANT SELECT ON dbname.dbtable to dbuser@”111.111.111.111″;
GRANT SELECT(colname) ON dbname.dbtable to dbuser@”111.111.111.111″;

set password for username = password(‘password’);
flush privileges;

mysqldump

1. dump all database into backup file

mysqldump –opt  –all-databases > /tmp/databkup

(–opt includes lock table option)

2. dump several databases

mysqldump –opt –databases db1 db2 db3 > /tmp/databkup

3. dump single table

mysqldump –opt db1 table1 > /tmp/databkup

Touble shooting
Error: Access denied for user x@y to database z when using lock tables
mysqldump -u username -p database –single-transaction >dump.sql

User tar to back up db

mysql> FLUSH TABLES WITH READ LOCK;

(This will lock the db so it won’t be updated by other threads. Write threads by other process will wait till the lock is released)

#tar cvzf /var/tmp/datadump.tgz /var/lib/mysql/*

mysql> UNLOCK TABLES;

Restore data
lock tables bbb write;
mysql bbb < /data_backup/databkup
unlock tables;

MySQL interface — PHP

Connect and Close connection to DB

$DB_HOST = “localhost”;

$DB_NAME = “mysql”;

$DB_USER = “mysql”;

$DB_PASS = “password”;

function conn_db(){

global $DB_HOST;

global $DB_USER;

global $DB_PASS;

global $DB_NAME;

if(!($conn = mysql_connect($DB_HOST, $DB_USER, $DB_PASS))) {

echo “Failed to connect DB”;

echo mysql_error($conn);

die;

}

if(!(mysql_select_db($DB_NAME))) {

echo “Failed to select DB”;

echo mysql_error($conn);

die;

}

return $conn;

}

function close_db($conn){

mysql_close($conn);

}

$conn = conn_db();

$sql = “select * from users where date>’20081001′ order by id”;

if (!($rs=mysql_query($sql))) {

echo mysql_error($conn);

die;

}

while ($row = mysql_fetch_array($rs)) {

echo “$row[0] $row[1]\n”;

}

Reset db slave

Some old data were missingon db slave server

copy data from master db01.lalife.net to slave db02.lalife.net and reset slave

On Master:

Lock table

mysql> FLUSH TABLES WITH READ LOCK;

mysql> show master status;

+——————+———-+————–+——————+

| File             | Position | Binlog_Do_DB | Binlog_Ignore_DB |

+——————+———-+————–+——————+

| db01-bin.000901 | 84861692 |              |                  |

+——————+———-+————–+——————+

cd /var/lib

tar cvfz  TARFILE_NAME.tgz mysql/

mysql > unlock tables;

On Slave:

cd /var/tmp/

tar -zxvf db01_bk.tar.gz

service mysql stop

##backup old db

mv /www/mysql /www/mysql0603

mv /var/tmp/www/mysql/ /www/

service mysql start

mysql>STOP SLAVE;

mysql>RESET SLAVE;

mysql> CHANGE MASTER TO MASTER_HOST=’db001.lalife.net’, MASTER_USER=’replication’, MASTER_PASSWORD=’xxxxx’, MASTER_LOG_FILE=’db01-bin.000900′, MASTER_LOG_POS=13482116;

mysql>START SLAVE;

How to get master bin file and position:

On master server

mysql> show master status;
+——————+———–+————–+——————+
| File             | Position  | Binlog_Do_DB | Binlog_Ignore_DB |
+——————+———–+————–+——————+
| db01-bin.000900 | 437292441 |              |                  |
+——————+———–+————–+——————+