FPN for Object Detection

My notes of reading this paper.

FPN stands for Feature Pyramid Network, used for improving Object Detection.

One traditional way to do Object Detection is to use sliding window with multiple window sizes which is in (a). However this method is slow and computational intensive. (b) and (c) are mentioned for approaches that used by others to overcome the disadvantage of (a).

The author also mentioned that a deep ConvNet can generate multiple scale features by sampling. However these feature maps for different spatial resolutions have large gaps which can harm the result.

(d) is the method this paper is promoting.

Resolution and semantic of feature :

Bottom-up, up-down path way and lateral connections

Bottom-up pathway is a regular ConvNet backbone with scale step=2(ResNet here), Up-down pathway is scaling up with step size=2 (with nearest neighbor upsampling).
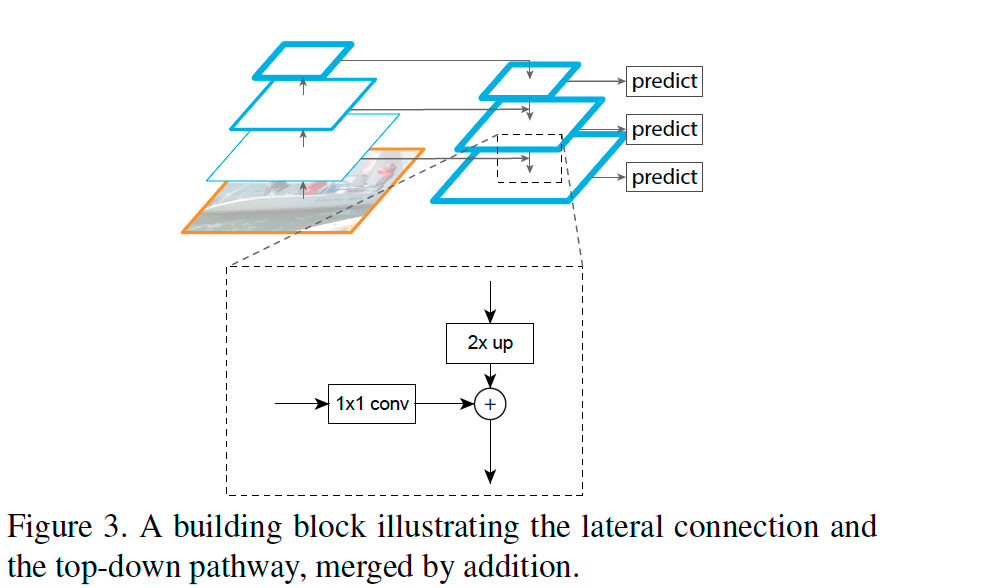
When adding the Bottom-up layer to the Up-down layer, the Bottom-up layer on the left has x2 times more channels, so it uses Conv 1×1 to reduce channel number to add the layer on the right by element wise. The up-down layer on the right has to upsample (x2) to match the hight and width of the left. The upsample can cause aliasing effect. Conv 3×3 is used to reduce this aliasing effect.

Code can find found here. Also thanks to this video for better understanding.

Nested X Server

Use Xephyr to run a second X window with 8bit color depth in Raspberry Pi
https://nims11.wordpress.com/2012/06/24/nested-x-servers-with-xephyr/

Xephyr -ac -screen 800x600x8 -reset :1 &

This will open a blank window
In the original window, type
DISPLAY=:1

Then run the C program. It show “Colomap_size: 256”.
It worked!

Softmax vs. Sigmoid function

We are familiar with Sigmoid function when learning Logestic regrestion, as well as in Neural Network as the non-linear active function.

Softmax function is another type of non-linear function


While Sigmoid is as the following in math,


How to separate them in usage? Here is a good explanation.

Also some good example for Softmax in Wiki

If we take an input of [1, 2, 3, 4, 1, 2, 3], the softmax of that is [0.024, 0.064, 0.175, 0.475, 0.024, 0.064, 0.175]. The output has most of its weight where the ‘4’ was in the original input. This is what the function is normally used for: to highlight the largest values and suppress values which are significantly below the maximum value…

Flash Nexus 5 with Android 6.0.1 and root

Rooted my Nexus 5 android following this instruction.

1. Backup the phone (Rooting will erase all setting and personal files on the phone & SD card)

2. Enable USB debugging:
Go to phone’s Setting -> About Phone, then keep tapping on “Build Number” until it shows “You are now a developer”

3. Unlock the bootloader & Flash Nexus 5 with the factory image

  • connect the phone to Mac by USB cable
  • Boot into Fastboot mode by “Volume Up + Volume Down + Power”
  • download the image.
    Factory images can be found here.
    Extract the downloaded file hammerhead-mob30y-factory-7f05cd7f.tgz
  • According to the instructions, normally running ./flash-all.sh will be enough. However this version might have a problem which cause the reboot after this stucks (or maybe just takes really long to boot up). The following way, which is to manually running the scripts, seemed helpful.(Found the solution from here)
  • Open a terminal on my MAC and ran the following commands,

    fastboot oem unlock
    fastboot erase boot
    fastboot erase recovery
    fastboot erase system
    fastboot erase userdata
    fastboot erase cache

    fastboot flash bootloader bootloader-hammerhead-hhz20h.img
    fastboot reboot-bootloader

    fastboot flash radio radio-hammerhead-m8974a-2.0.50.2.29.img
    fastboot reboot-bootloader

    fastboot flash boot boot.img
    fastboot flash recovery recovery.img
    fastboot flash system system.img
    fastboot flash userdata userdata.img
    fastboot flash cache cache.img
    fastboot reboot-bootloader

    4. Get Android-studio from here
    twrp from here. This is a better recovery tool.
    SuperSu from here

    5. Install custom recovery
    Go to directory which contains the Andriod-studio files (on Mac)
    #which fastboot
    /Users/myuser/android-sdk/android-sdk-macosx/platform-tools/fastboot
    #cd /Users/myuser/android-sdk/android-sdk-macosx/platform-tools/fastboot
    #fastboot flash recovery twrp-3.0.2-0-hammerhead.img
    #fastboot reboot-bootloader
    Power-off the phone and enter the Fastboot mode again, switch to Recovery mode and proceed, then the custom recovery will be shown.

    6. Root the phone
    On Mac terminal:
    #adb push UPDATE-SuperSU-v2.76-20160630161323.zip /sdcard/
    Boot the phone into Fastboot mode then switch to recovery mode as before.
    Click on install, then choose SuperSu zip file and click “Install image”.
    Reboot.

    7. The phone couldn’t get connection from carrier(Sprint) after the changes above, ran the following code on the dial pad, then the problem got fixed.

    *#*#72786#*#*

  • Setup AWS API tool

    Setup AWS API tool

    Download API tool
    wget http://s3.amazonaws.com/ec2-downloads/ec2-api-tools.zip
    unzip ec2-api-tools.zip -d /usr/local/ec2

    Where is Java?
    which java
    file /usr/bin/java
    file /etc/alternatives/java
    /usr/lib/jvm/jre-1.x.0-openjdk.x86_64/
    User this path for the config

    Setup env
    vi ~/.bash_profile

    export JAVA_HOME=”/usr/lib/jvm/jre-1.x.0-openjdk.x86_64/”
    export EC2_HOME=”/usr/local/ec2/ec2-api-tools-1.7.3.0″
    export AWS_ELB_HOME=”/usr/local/ec2/ElasticLoadBalancing-1.0.35.0/”
    export PATH=$PATH:$EC2_HOME/bin:$AWS_ELB_HOME/bin
    export aws_access_key_id=”AAAAAAAAAAAAA”
    export aws_secret_access_key=”KKKKKKKKKKKKKKKKKKKKKK”
    export EC2_URL=”https://ec2.us-west-1.amazonaws.com:443″